Improving email deliverabilty
Authenticating Your Email
Email authentication
Email authentication verifies that an email is actually from you or your business. Think of it like a digital signature: it protects your brand, identity and reputation. It’s one of the most important steps you can take to improve your deliverability.
This article explains why it’s important to authenticate DKIM, SPF & DMARC, and how it changes the way email servers and email clients treat your email.
Why authentication matters
The way email was originally designed makes sender details easy to forge, or “spoof”. Spammers and phishers take advantage of this by posing as banks, auction sites, energy companies or otherwise to steal money or spread malicious software. In addition to harming the recipients of these scam emails, the companies and brands that have been impersonated are also harmed.
Email services such as Gmail, Outlook.com and Yahoo use email authentication to help determine if something is spam, or is worth blocking completely to protect their users. As such, any unauthenticated email, no matter how legitimate the content, runs the risk of ending up in someone’s spam folder.
Authenticate your domain: DKIM
We aim to simplify domain authentication for partners by working together. To get started, contact your representative at Extu and provide or confirm your sending domain. Your sending domain is the email address that recipients see in their inbox, so it should reflect your brand and be easily identifiable as related to your business.
Authenticating your base domain will not authenticate subdomains, each unique domain or subdomain must be authenticated separately.
Example: Authenticating just the base domain name designco.com will not authenticate mail.designco.com.
Your Extu representative will first:
- Generate the DNS TXT Name/host and TXT Value for your sending domain.
- Share the DNS TXT Name/host and TXT Value with you.
You (or your IT department) will need to:
- Login to your DNS host.
- Create a new DNS record, and set the type to TXT.
- Copy the Name/host field to paste into the corresponding field in your DNS. For the TXT name/host, what you enter depends on your DNS host. Note: Some require you to enter the full cm._domainkey.exampledomain.com, others only need the cm._domainkey part.
- Copy and paste the TXT Value into the appropriate field in your DNS record.
- Set a TTL value of at least 300 seconds (some hosts may require a higher value like 30 minutes).
You can validate that your record is published by using a tool like EmailStuff. Tip: If using EmailStuff, the selector you’ll enter is “cm” along with your domain name.
Finally, you will need to confirm completion with your representative:
Once these steps are completed, your Extu representative will verify the record and confirm if authentication is complete and/or provide further guidance.
It can take up to 72 hours for DNS propagation; that’s the maximum time required for DNS servers worldwide to update their cached information for that domain. Once complete, the record should be visible on your zone records.
Some DNS hosts do not support semicolons ( ; ) or underscores ( _ ), which are required to authenticate with Campaign Monitor. In some cases, you can work around semicolons by replacing any occurrences of ; with \;. If this doesn’t work, or your host doesn’t support underscores, you may need to switch DNS providers to authenticate your email.
Any questions or problems? This resource can help you troubleshoot errors and apply solutions.
Authenticate your domain: SPF
The final step in the authentication process is to add an SPF record for your sending domain. This action will provide receiving servers further evidence of the legitimacy of the mail you’re sending through our servers.
The process depends on whether you already have an SPF record in place. To determine that, you can use the EmailStuff SPF checker or just look for a record on your sending domain that contains “v=spf1”.
These steps assume you are already logged into your DNS host.
If you have an SPF record already:
- Add include:_spf.createsend.com immediately after the “v=spf1” in the existing record. Make sure you include a space.
- Save the record and recheck (you may need to wait until the time indicated by the TTL passes).
If you do not have an SPF record:
- Create a new DNS record, and set the type to TXT.
- Type @ into the name field, or leave it blank, depending on the requirements of your DNS provider.
- Copy this code exactly into the value field: v=spf1 include:_spf.createsend.com ~all
- Set a TTL value of at least 300 seconds (some hosts may require a higher value like 30 minutes).
- Save the new SPF record.
- You can wait a few minutes and check your new record in a validator like EmailStuff.
Authenticate your domain: DMARC
Once you have verified your DKIM & SPF setup, the next step is to ensure that your sending domain also has a valid DMARC record.
You can check that what’s there is valid with a tool like EmailStuff validator if you’re not certain. As with all technical things, get assistance for your IT department if needed.
If you do not have a DMARC record, the one we are suggesting is the minimal valid record. It is safe to add without having any adverse impact on any of your organization’s mail, and will be useful for establishing the legitimacy of the email you’re sending.
- Login to your DNS host.
- Create a new DNS record, and set the type to TXT.
- Type _dmarc into the name field. Some require you to enter the full _dmarc.mail.example.com, others only need the _dmarc part.
- Copy this code exactly into the value field: v=DMARC1; p=none;
- Set a TTL value of at least 300 seconds (some hosts may require a higher value like 30 minutes).
- Save the new DMARC record.
- You can wait a few minutes and check your new record in a validator like EmailStuff
Instructions for modifying DNS records
Below are links to instructions from commonly used DNS providers for changing their TXT records. If you have a different host, they may have their own instructions, or one of examples below may be similar.
COMMONLY USED DOMAIN HOSTING SOFTWARE:
COMMONLY USED DNS PROVIDERS:
Manage your own authentication with DKIM
DomainKeys Identified Mail (DKIM) is a way to authorize Email Service Providers (ESPs) to send email on your or your company’s behalf. DKIM authentication allows a sender to take responsibility for their email, and is used to help separate legitimate email from spam and phishing campaigns.
To authenticate using DKIM, you will need:
- your own domain name, which you are using for your email address
- access to your domain’s DNS records
- familiarity with modifying DNS records
Manage your own authentication
Managing your own email authentication is highly recommended. The default level of authentication added to each email sent through Campaign Monitor proves that the email came from our servers, however, to prove that the email comes from your or your company’s domain, you need to authorize Campaign Monitor to send on your behalf. This is the case with all Email Service Providers (ESPs).
You can do this by modifying the DNS records attached to a domain name you own, so that any email sent through Campaign Monitor is verified as coming from your own domain. Authenticating this way improves deliverability, as you are properly stating your identity to recipient mail servers.
How authentication affects deliverability
Managing your own authentication changes how your emails are displayed in email clients. If you haven’t authorized an ESP to send email on your behalf, many major email clients flag the email as coming from a different server, which can potentially cause the email to be blocked, or lead recipients to believe they’re receiving spam.
New Google and Yahoo sender requirements for 2024
In summary, it is now a requirement to authenticate your domain using DKIM, SPF, and DMARC (the three methods which are mentioned in this document). In addition, you should also continue to ensure that you are following best practices with obtaining permission and respecting unsubscribes.
For example, in Outlook 2016 if you haven’t authorized your ESP to send email on your behalf, your email will display in the recipient’s inbox as being “sent by” someone else. In the image below, while the From address shows correctly as “sally@designco.com”, the email is flagged as coming from a Campaign Monitor mail server (“cmail2.com”):
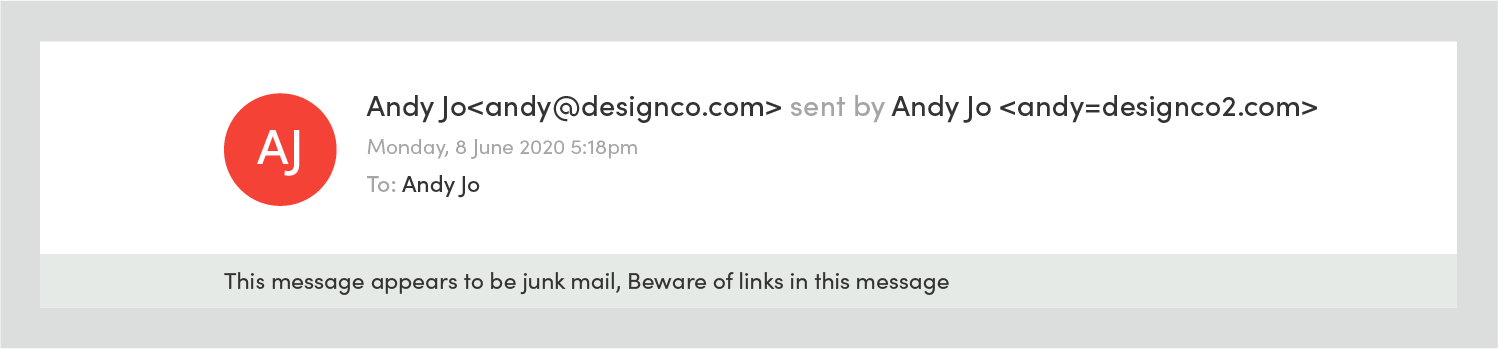
In this case, the email has also been sent to the junk folder as a result of the sending domain not being authenticated. This won’t happen every time — unauthenticated mail can still make it to the inbox, and there are many other reasons why an email can be filtered as spam.
Once you have authenticated your own domain, the “sent by” phrase and sending server are not present:

Gmail uses the word “via” to indicate an email hasn’t had its sending domain authenticated:

After authenticating the sending domain, “via” and the sending server are removed:

Similarly, Outlook.com uses the phrase “on behalf of:”

This is removed for domain authenticated email:

Frequently asked questions
Below are some answers to questions we’re commonly asked about authentication. For help with something we haven’t addressed, please visit the Knowledge Base by clicking here.
MY HOST DOESN’T ALLOW ME TO MODIFY MY DNS, WHAT SHOULD I DO?
Some web and DNS hosts won’t let you modify your DNS records yourself, however many will add authentication records for you. Contact your host to find out if they offer this service.
MY WEB HOST DOESN’T SUPPORT DKIM, DO I HAVE TO SWITCH TO ONE THAT DOES?
Not necessarily. DNS records are usually hosted by the same company that hosts your site, but it doesn’t have to be that way. It’s possible to keep your webhost and change who provides your DNS records using services like DNS Made Easy, ZoneEdit and easyDNS.
WILL ALL EMAIL SENT THROUGH THE SELECTED DOMAIN BE AUTHENTICATED?
After following the instructions above, only emails sent through Campaign Monitor using your chosen domain will be authenticated. Emails sent through other services that use the same domain will not be authenticated. If you opt to send email from an unauthenticated domain in Campaign Monitor, your email will also not be authenticated.
MY DNS RECORDS ARE STILL NOT VERIFIED IN MY ACCOUNT, WHAT SHOULD I DO?
DNS record changes can take a while to propagate, sometimes more than 24 hours. If the records still cannot be verified after a few days, it may be because they were not added correctly.
You can use a third party DNS testing tool like EmailStuff to check if DNS record changes have propagated. On the EmailStuff site, click DNS, enter the domain name you are trying to verify into the hostname TXT field and click the TXT button.

If the record has propagated, the “Answer” given will contain the TXT value that Campaign Monitor generated for you earlier, and the “DKIM” tag will be in the “Type” column.
If no record is found, try lowering the “time to live” (TTL) value in your DNS. This is the amount of time DNS servers will cache your record for, and lowering the value will make the record propagate faster. The method to do this will vary depending on the DNS host you use.
If after this the records are still not showing up, contact your DNS host to make sure everything is working as it should be, and if there are no problems found, please contact support and let them know the domain name you’re trying to authenticate.
In this article
- Video: Email authentication simplified
- Email Authentication
- Why authentication matters
- Authenticate your domain: DKIM
- Authenticate your domain: SPF
- Authenticate your domain: DMARC
- Instructions of modifying DNS records
- Manage your own authentication with DKIM
- Manage your own authentication
- How authentication affects deliverability
- FAQs
